转自我前UCOM同事的一篇图文教程
目的:实现群集连续复制
重点:需要AD的支持
环境:
DC:
IP:172.16.1.1/24
DNS:172.16.1.1
MAILONE:(Node1)
Public IP:172.16.1.10/24
Private IP:10.10.10.1/24
DNS:172.16.1.1
MAILTWO:(Node2)
Public IP:172.16.1.20/24
Private IP:10.10.10.2/24
DNS:172.16.1.1
Windows Cluster
IP :172.16.1.6
NAME:EX07CCR
MAIL CLUSTER
IP:172.16.1.8
NAME:MAILCCR
环境介绍完毕,我们开始部署
先设置MAILONE(Node1)的网络设置,选择高级-高级设置 配置好Public和Private里的绑定设置


接下来配置两快网卡的地址和设置内容
Public设置

Private设置


接下来就是MAILTWO(Node2)的网络设置,除IP不同,其他配置都和Node1一样!!!!!!!!!!!!
Windows Cluster 的配置,我们在MAILONE(Node1)上进行.
打开管理工具里的群集管理器

创建新群集
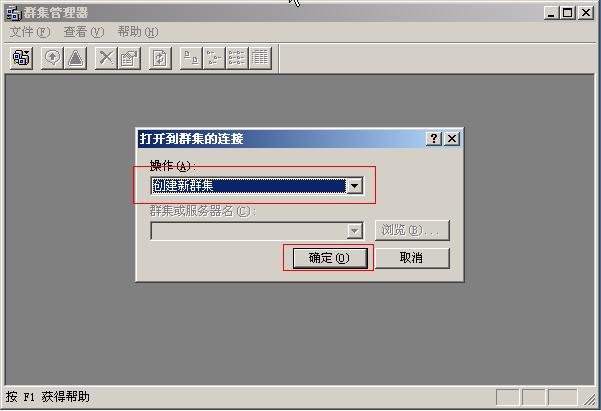

想好一个群集体的名吧,这里我就用EX07CCR


需要最高权限帐户

注意:这里我们要选择”仲裁”里的”多数节点集”


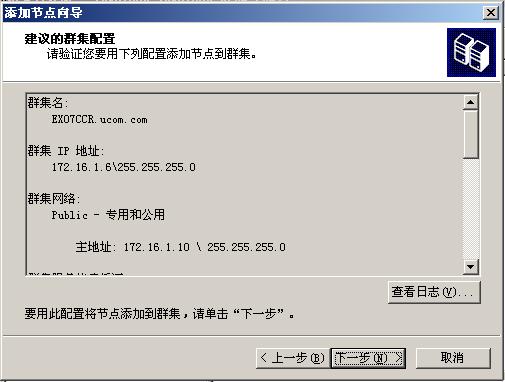
第一个节点设置好了,我将第二个节点MAILTWO添加进来吧


输入前面设置好的帐户的密码


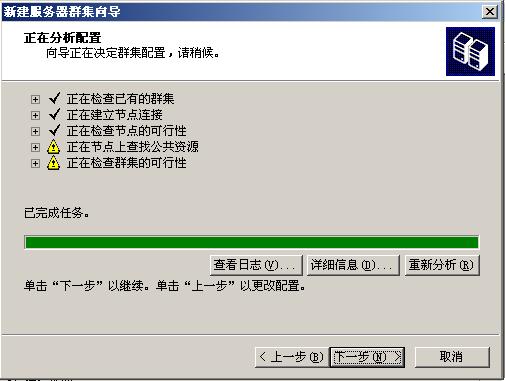
Windows Cluster 已经设置完毕,我们进到管理器里看是否已经正常运行

最重要的一步:在集线器角色上建立一个共享文件夹,在这里我将在DC的C盘里建立一个名叫MSN的文件夹共享并赋予前面设置的用户的最高权限


注意:设置好共享文件夹后我们一定要转到MAILONE(Node1),在CMD里敲入以下两条命令:
cluster res “多数节点集” /priv mnsfileshare=”\\dc\mns”(也就是共享文件夹的网络路径)
cluster group “群集组” /move

开始部署Exchange 2007 老样子,安装前的组件是不能少的(IIS、MMC3.0、NET3.0、PowerShare1.0、KB92677)
我在这里,我先将“客户端访问角色”“集线器传输角色”部署在了DC上


前两个角色已经成功部署完成,下面我们将在MAILONE(Node1)上部署“主动群集邮箱角色”(前提还是组建一定要安装好)

选择“群集连续复制”填好事先准备的“群集邮箱服务器名”和“群集邮箱服务器IP地址”

等待它的部署完成吧(忘记抓图了,呵呵)
主动群集邮箱角色部署完后我们转到MAILTWO(Node2)也就是节点二来部署“被动群集邮箱角色”(千万别忘了组建)


所有的部署步骤都已经完成,接下来我们将测试:将两个节点中的其中一台断开,看邮件是否能够正常发送,Windows和MAIL群集的地址是否还都能PING通
我们新建一个邮箱帐户来测试


给自己发封邮件是正常的,能发送接收和PING通


正常之后我们模拟另一节点此时出错当掉了,看邮件收发和PING是否正常

经过测试,此时都是正常的,实验成功!!!!!!!鼓励鼓励!!!


